Inserting Drawings, Tables and Links
To follow along, create a new google document, name it, and click on the "Insert" menu across the top. Here is how your screen should look:

In the last lesson, you learned how to insert images into your word processing document by clicking on "Insert", then "Image." But what about if you want to insert something else into your document - say, a drawing, a table, or a link?
INSERTING A DRAWING
Click on "Insert" then "Drawing". You will see a window come up that looks like the one shown below, only without the bright green labels and the shapes drawn:

Here, you can use google docs drawing capabilities to add some variety to your document. Across the top of this screenshot, I labeled what the tools of the drawing feature are in green. You can add different shapes, lines, images, etc. When you are done creating your drawing, click on "Save and Close" in the top right. This will insert your drawing into your word document, like so:
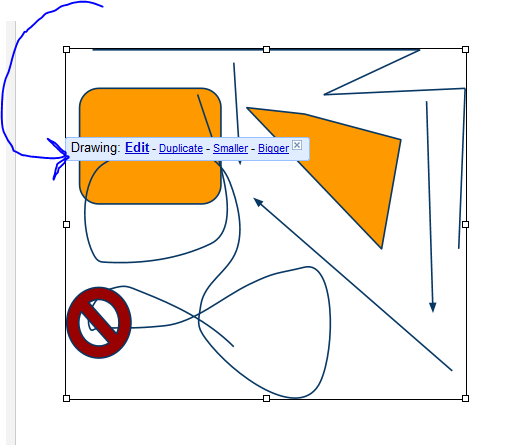
When you click on the drawing to select it, you can see that it is just like putting in any other image into the document - except for the menu that pops up when the drawing is selected. Notice that you can click to continue editing your drawing, duplicate it, or make it smaller or bigger.
INSERTING A TABLE
Click on "Insert" then "Table". You should see a menu come up like the one shown below.

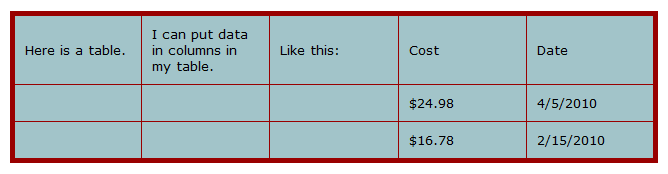
A table can be really helpful for displaying data in a neat and organized way. The "Insert Table" options menu allows you to customize your table. First, select the rows and columns that you want in your table. You then have options for how wide the rows/columns are.
Layout means where the table is on your document - padding is the space around the table. It will add a little buffer of nothingness so words aren't pressed right up against it. Align means if the table is on the left, center or right side of the page.
You can add a border color and select your border thickness to your table, as well as change the background color. Once you have all of the settings to your liking, hit insert and your table will be placed into your document, like so:
INSERTING A LINK
This will allow you to use actual webpage links within your word processing document. That way, your reader can click on the link while reading and it will take them to that particular website.
To insert a link, first type the words that you want to create as the link. There are 2 different examples below. One example is that I want to link to a website, and the website is typed out. Another example is a word that I want to put a link on. They are both underlined in blue:
Now, highlight whatever word/words you want to create the link for. In the 2 examples above, I will highlight "www.google.com" and "pigs". Then go up to "Insert" and click "Link". The following window will pop up:
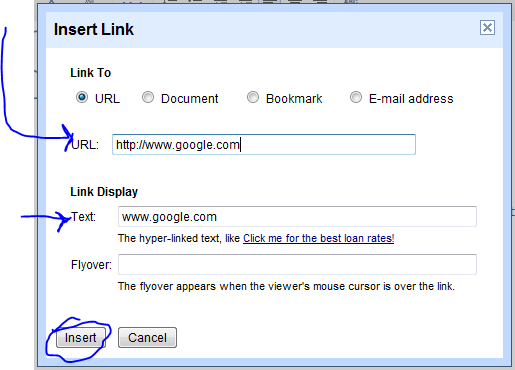
Type in the URL that you want the link to go to. In this case, I typed in "http://www.google.com". Then, I verified that the text I wanted in the link display is "www.google.com". I then hit insert. I'll do the same thing for my link for "pigs":
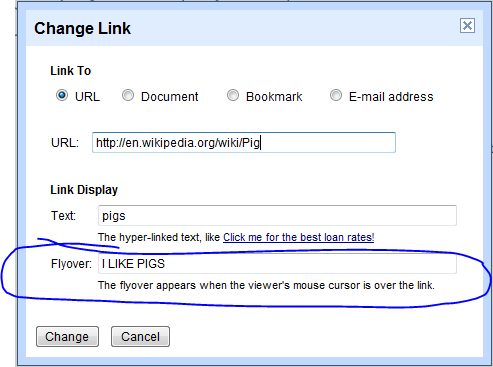
This time, I put a flyover text on my link. I'll show you what I mean. In the screenshot below, you can see both of my links that I added. When I mouse over "pigs" my flyover text pops up. Pretty neat!

Last modified: Tuesday, June 21, 2011, 12:00 PM